Course Examples
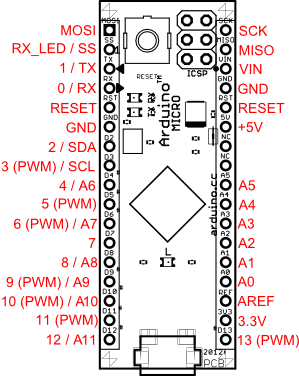
Arduino Micro Pinout
Summary
Students in this course will build the own game controller from scratch capable of providing input to a variety of PC games. The course includes instruction on resistors, switches and using Arduino to behave as a USB keyboard and mouse.
This is based on labs 1 and 2 from E190U offered in Spring 2015 at Harvey Mudd College.
Overview
This course introduces some concepts of basic resistor circuits and how they can be read by a microcontroller using an analog to digital converter. In particular, we will look at the use of joystick potentiometers as a standard sensor element for game controllers as well as tactile buttons combined with pull-up or pull-down resistors to provide digital inputs. Additionally, Arduino software will be developed to treat the joysticks, buttons and switches as standard USB keyboard and mouse input that can be used for PC games. With the rapid increase of maker culture and do-it-yourself projects in recent years, this course provides an easy introduction to circuits and microcontrollers for the uninitiated and allows more advanced students the chance to tune the hardware and software to customize the user experience.
Prerequisites
This course is intended for people with little to no experience with programming or electronic circuits. If you have some C programming experience or understand resistor circuits you will more quickly be able to complete the tasks in the course.
Materials
You will need the following materials to complete the construction of your own game controller.
I will add links to where I bought the materials for these kits. If you need them now, please email me.
- Arduino Micro (or any arduino capable of USB keyboard+mouse control)
- A computer with the Arduino software development environment installed
- Mini breadboards
- 2 Joystick Potentiometers with breakout boards
- 8 Push-buttons
- Wires
- Soldering Material (only if you don’t have appropriate wires)
- Something to mount these on (this could be wood, metal, tooled plastic, or even 3d printed!)
Parts for approximately 1 Controller
| Part | Price | Vendor Link | Quantity | Total Price |
|---|---|---|---|---|
| Arduino Micro w/ USB cable | $8.00 | Banggood | 1 | $8.00 |
| 5 piece 170-hole mini breadboards | $5.68 | Banggood | 1 | $5.68 |
| 1 Piece Joystick w/ breakout | $1.66 | Banggood | 2 | $3.32 |
| Tactile Switches | $0.50 | Sparkfun | 10 | $5.00 |
| 40 piece female to male cables | $2.10 | Banggood | 1 | $2.10 |
| 3M Outdoor Mounting Tape | $4.00 | Amazon | 1 | $4.00 |
| Total | —- | —- | 1 | $28.10 |
Parts for multiple (20) controllers
| Part | Price | Vendor Link | Quantity | Total Price |
|---|---|---|---|---|
| Arduino Micro w/ USB cable | $8.00 | Banggood | 20 | $160.00 |
| 10 piece 170-hole mini breadboards | $10.20 | Banggood | 4 | $40.80 |
| 20 Piece Joystick w/ breakout | $16.99 | Banggood | 2 | $33.98 |
| Tactile Switches | $0.50 | Sparkfun | 200 | $100.00 |
| 40 piece female to male cables | $2.10 | Banggood | 20 | $42.00 |
| 3M Outdoor Mounting Tape | $4.00 | Amazon | 5 | $20.00 |
| Total | $19.84 | —- | 20 | $396.78 |
For best results, you should have your mount moulded or tooled to be ergonomic and comfortable to hold in your hand. It should be possible to 3D print a design, or you could purchase the design I distributed at SIGGRAPH from pokono. (link to be added).